Developers are lazy. At least the good ones are. Beyond that, we have too much to do and too little time. For both of these reasons, we are constantly searching for ways to use less effort to create more results and we do this by finding patterns in the way that we build things. We then use those patterns to invent ways to build those things faster.
These are some of the reasons that web components exist today and why they’re quickly becoming ubiquitous across the web. They’re still pretty new to me, but let me tell you what I know about them.
What exactly are Web Components?
Web components are basically reusable UI elements. Made up of several different technologies, they make it easier for a developer to quickly build applications. This means that anyone can create a component, like a navbar or a search box, once and then use it over and over again with minimal effort. There are also libraries of prebuilt components that are ready to use and easy to customize if need be.
Why use Web Components?
I got right to the laziness issue and I touched on the fact that there isn’t enough time in the world to build everything that we need to build, but what about more concrete reasons?
Here are a few real problems that web components solve:
- Undescriptive markup - Sure, we have HTML5 with its semantic markup that includes articles and asides, but how many of your app’s parts actually fit within the limited vocabulary of this developing standard? With web components, you can name the elements that you are going to use with a name that actually makes sense in your context.
- Style conflicts - The web component spec takes advantage of the shadow DOM (Which we will get to shortly) so that the scope of each component is isolated. It makes it possible to build more modular apps without the fear of breaking everything with a rogue style definition.
- No native template standards - We’ve been using all kinds of markup templating solutions and we all have our favorites, but the idea that web components will standardize an easier way to write fast markup will make life easier for everyone.
- No native bundling - I’ve mentioned that web components are made up of multiple technologies and I’ll get to those in the next section, but for now, know that a web component can effectively bundle HTML, CSS and JavaScript and you can import the entire thing with one simple import statement.
The Four Technologies of Web Components
- templates - define inert reusable markup
- custom elements - extend HTML
- shadow DOM - provides encapsulation of markup and styling
- imports - support bundling html, javascript and CSS files
Side note: these technologies are not yet supported in all major browsers. Chrome does have full native support and you can use polyfill libraries like webcomponents.js to implement web components in other browsers
Templates
In this section, I’m going to introduce the <template> tag, show you how to activate it and how to inject dynamic data.
The Template Tag
This is it:
<template> ... </template>
It looks like a regular HTML tag, but it’s special. All markup inside the template tag is inert until it is cloned and utilized on the page. The content is hidden from traditional selection techniques because it is not traversed like other DOM elements. In order to access the elements inside, you have to use the content property of the template.
You can place the template tag anywhere on the page (head, body, etc.). For example, I might make place a template block that looks like this right after my opening body tag:
	<template id="my-template">
		<p> I'm coming from a template. </p>
	</template>
To activate the template, I use JavaScript. I need to target and select the template, clone it (meaning copy its content) and then append it to the page. The code would look like this:
	var template = document.querySelector(#my-template);
	var clone = document.importNode(template.content, true);
	document.body.appendChild(clone);
Passing template.content in as the first parameter of the importNode method clones the content of the template. The second parameter of importNode determines whether it is a deep copy.
All together now…
	<template>
		<p> I'm coming from a template. </p>
	</template>

	<script>
		var template = document.querySelector('#my-template');
		var clone = document.importNode(template.content, true);
		document.body.appendChild(clone);
	</script>
Inject Dynamic Data into Templates
You can inject data before cloning the template’s content by manipulating the template clone. First, you would get a reference to the template, then use document.importNode to clone the template’s content. Next, change the target element within the template as desired and, finally, append the element to the page. For example:
	<template>
		<p>Ducks are <span class="adjective"></span>!</p>
	</template

	<button onclick="copyTemplate()">Copy Template</button>

	<script>
		function copyTemplate() {
			var template = document.querySelector('template');
			var clone = document.importNode(template.content, true);
			clone.querySelector('.adjective').textContent = 'awesome';
			document.body.appendChild(clone);
		}
	</script>
This code will append this paragraph to the page:
Ducks are awesome!
Custom Elements
Custom elements are a newish way of creating your own HTML tags and elements. They are part of web components but can be used on their own and there are a couple ways to implement them. You can either define your own HTML element (note that the name must have a dash -think of the first dash as a namespace) or extend existing elements by adding an ‘is’ attribute. For example:
<input type="text" is="search">
Register and Use Custom Elements
Register and use custom element with a simple three step process:
-
Create a prototype for the custom element:
 var custom-element = Object.create(HTMLElement.prototype);
 //Add properties and functions to prototype here
Note that when creating new custom elements with theObject.createmethod, the parameter that you pass in will usually beHTMLElement.prototypesince custom elements are derived from a prototype. The exception is when you are extending an HTML element - in that case you would pass that element prototype in as an argument instead. -
Register the element via the registerElement method:
document.registerElement('custom-element'); -
Use it: Add to DOM or place tag on the page
 document.body.appendChild(new customElement());

 or

 <custom-comment/>
Instatiate Custom Elements
There are four different ways to instantiate a Custom Element
-
Create a tag in the markup
<custom-comment /> -
new Operator (You would need to append it to the DOM seperately)
var comment = new customComment(); -
createElement
var comment = document.createElement('custom-comment'); -
innerHTML
el.innerHTML = '<custom-comment />;
Shadow DOM

Finally, we get to the Shadow DOM! How exciting! The shadow DOM provides encapsulation for the JavaScript, CSS and templating in a Web Component. A Shadow DOM makes it so these things remain separate from the DOM of the main document. A Shadow DOM must always be attached to an existing element.
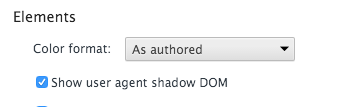
Before moving on, take a minute to open the settings in your browser Dev Tools. Under ‘Elements’, click on ‘Show user agent Shadow DOM’. This will allow you to see the shadow DOM of native controls.
And, before we move on together, let me introduce some vocabulary so we are sure we can be sure that we are speaking the same language.
- light DOM - the standard DOM - what you see on the page
- shadow DOM - hides away complexity
- logical DOM - umbrella term that covers both light and shadow DOM
- shadow root - the root node of a shadow tree
- shadow host - the element in the light DOM that hosts the shadow DOM
- shadow boundry - encapsulates styling rules that are defined within a given piece of the shadow DOM (there are some ways to get around this.
Got that? Great. Let’s create a Shadow DOM.
Create a Shadow DOM
It’s another three step process:
- Select a shadow host
- Create a shadow root
-
Add elements (the same way that you append elements to the light DOM)
 <template>
     <h1>Hello world from the shadow DOM</h1>
 </template>

 <div id="host>
     <script>
         var host = document.querySelector('template');
         var root = host.createShadowRoot();
         root.appendChild(document.importNode(template.content, true));
     </script>
 </div>
As the Shadow DOM encapsulates its own elements and their styles, regular styling will not work on the shadow DOM. You can, however, define styles within the template tag that will only affect the shadow DOM. JavaScript, on the other hand, is not encapsulated in the Shadow DOM. Any Javascript that is defined within the tempate tag will still be traversed and manipulated with the light DOM and be attached to the window element. The markup inside the shadow DOM is still protected from JavaSript manipulation because it cannot be traversed with traditional selection methods. You can use IIFEs to encapsulate code.
Imports

Both templates and imports are a way to store inert HTML, but imports have two unique qualities:
- They support storing HTML in another file
- They support bundling HTML, CSS and JavaScript
Using Imports
<link rel="import" href="component.html">
This code brings in everything that is in the ‘import location’ identified by the href attribute in the link tag. Imported HTML is inert until you clone it onto the page. Imported JavaScript and CSS are applied immediately .
Now What?
This was just the beginning. Hopefully you have a better understanding of what a web component is and what it’s made of. There is a lot more studying to.
Check out these resources for more info:
Have you used web components in any of your projects? What has your experience been?
blog comments powered by Disqus